Tuesday, January 8, 2013

Robots against CANCER at last !!

Da Vinci robot  
A surgeon remotely controls the Da Vinci robot, seen here in the background, by using video game-like technology


Snake robot prototype  
The researchers hope that snake robots could help spot and remove tumours more effectively

Related Stories

A 30cm (1ft) snake slowly moves through the body of a man on a spotless table, advancing its way around the liver.
It stops, sniffs to the left, then turns to the right and slithers behind the ribcage.
This is a medical robot, guided by a skilled surgeon and designed to get to places doctors are unable to reach without opening a patient up.
It is still only a prototype and has not yet been used on real patients - only in the lab.
But its designers, from OC Robotics in Bristol, are convinced that once ready and approved, it could help find and remove tumours.
The mechanical snake is one of several groundbreaking cancer technologies showcased at this week's International Conference on Oncological Engineering at the University of Leeds.
Most of the devices are in very early trial stages, but Safia Danovi from Cancer Research UK says that innovation and research are extremely important in tackling the disease.
"Surgery is a cornerstone treatment for cancer so new technologies making it even more precise and effective are crucial," she says.
"Thanks to research, innovations such as keyhole surgery and robotics are transforming the treatment landscape for cancer patients and this trend needs to continue."
Cancer accounts for about 13% of worldwide deaths every year, according to the World Health Organization.
Although some cancer treatments involve non-invasive methods, surgeons often need to get inside the body - a procedure that is often risky.
Snake robots could be as minimally invasive as possible with today's technology - they would use body orifices or local incisions as points of entry, says Rob Buckingham, managing director at OC Robotics.
They would allow a surgeon to look and "feel" inside the body - by using cameras and extremely sensitive equipment to provide feedback.
Mechanical arms Snake robots could complement a robotic surgical system that has been used for the past decade - the Da Vinci machine, developed by US company Intuitive Surgical.
This mechanism looks like a human-size robot with four "arms" equipped with pincers.
Although it cannot perform surgery autonomously, it has allowed doctors to make complex operations less invasive and more precise.
Mirosurge Robotic arms designed by DLR could be an alternative to the Da Vinci robot
The Da Vinci is controlled by a surgeon sitting in a nearby chair and looking at a screen displaying the area of the body where the surgery is taking place. The surgeon manipulates the robot by pressing pedals and moving levers.
Many hospitals around the world have opted for the Da Vinci, despite the cost of about £1.4m ($2.2m).

“Start Quote

It is about tracking surgical instruments, so that a surgeon sees on a computer screen as a medical tool moves through the body”
Stefan Weber University of Bern
Another option is a thin, long mechanical "arm" called Mirosurge, developed by German aerospace centre DLR.
It is also only a prototype, but a DLR engineer who described the technology at the conference says that in the long run, the robot is more versatile than the Da Vinci machine.
"You can attach different tools to it and it can be used either as a one-arm application or as four arms on a surgical table to assist a surgeon controlling them from a workstation," says Sophie Lantermann.
"Also, it has sensors in all the joints, allowing it to detect collisions. For instance, when there's a patient between two arms of the Da Vinci, one arm can hit the other, but our robotic arm detects another arm working next to it.
"It can be a lot cheaper for a hospital because you can use it all day long for different applications."
Glowing tumours One of the challenges with cutting away a tumour is making sure that all of it is removed.
For this, the surgeon needs to understand where the tumour stops, which can be tricky.
At the University of Bern in Switzerland, scientists inject a drug into the patient's body and once attached to the tumour, it starts glowing when light is shone on it.
This imaging technology is also applied to instruments as they navigate inside the body, the same way a GPS helps us find our way home.
"It is about tracking surgical instruments, so that a surgeon sees on a computer screen as a medical tool moves through the body, overlaying it with CT scan data - just like an augmented reality application," says Stefan Weber from the ARTORG Center for Biomedical Engineering Research at the University of Bern.
"If you look at the liver, for example, it's a homogeneous, reddish-brownish organ, but you would like to see where the tumours are.
Da Vinci, glowing tumours By making tumours glow, it is easier for surgeons to spot them on a screen using augmented reality technology
"We scan the patient, derive a 3D model of the liver with the vessels, and in that model we see the tumours so we can tell the surgeon where to cut.
"Detection of vessels, aligning the model with the patient's anatomy, and doing it precisely - even five years ago computers weren't able to do this."
At Leiden University Medical Centre in the Netherlands, scientists are developing a similar technique.
But one of the main topics of discussions at the conference has been about making new technologies work together.
"If we start to combine, for instance, our snake-like robot that can nose-follow to avoid or reach behind organs within the body, with sensors that can identify and lock in on the target that has been marked in some special way, then there may be clinical benefit," says Rob Buckingham.
"Part of the challenge is to think about that benefit. Typically we start travelling in a specific direction, assuming a benefit, and then realise that the goal isn't quite where we expected.
"The important thing is to start moving, to learn."

Monday, January 7, 2013

THE PROFESSIONAL's JOURNAL: Enhancing Blue Skies in Lightroom

THE PROFESSIONAL's JOURNAL: Enhancing Blue Skies in Lightroom: The Color control in Lightroom is a powerful tool for selective color adjustments. This tool allows photographers to adjust the hue, satu...

11 Tips for Dynamic Portrait Photography in the City


If you live in a city (or plan to travel to one), you have an energetic, dynamic backdrop for portrait photography as your playground. Urban portrait photography lets you capture environmental portraiture in a way that you can't do anywhere else.

There's nothing like being in the city to set a mood and give your portrait photography an atmosphere that you can't find anywhere else. And each city has its own flavor. Toronto, New York City (home of Adorama!), Chicago and San Fransisco—all older cities—have a certain look to them, while newer, southern cities like Atlanta, Phoenix and Miami offer a different quality of light and a different kind of architecture. Some cities have lots of “steel-and-glass” towers, others are more the brick-and-mortar look, while others have tanned, stucco walls that reflect light differently and offer different kinds of backgrounds. The great things about most cities, though, is that if you want to change the look, all you have to do is walk up the block, or find another neighborhood with its own, unique character.

No matter what city you call home (or your next travel destination), each offers a visually rich palette of light, color, motion and emotion that can enhance your portraits and infuse them with an energy that you simply can't capture in a studio, rural or suburban environment.


Here are five tips for shooting dynamic portraits in the city. Note that they all have something to do with light!

Photo © ParkerDeen/iStockphoto


1. Be aware of the light. It can change by the simple act of crossing the street. In densely-packed areas with tall all-window buildings, you can expect wacky reflections on sunny days as the sun's rays bounce around. Work with them! Watch how the quality of light changes over the course of the day, and think about where and when light will be best. Avoid harsh mid-day overhead sunlight whenever possible because that will cause "possum eyes", and the bright sunlight might also cause your subject to squint. Mid-day is a good time to work under an awning, or in other kinds of open shade, or indoors. Or, just take a lunch break. My favorite light? Light overcast—it turns the sky into a huge, flattering softbox (see above shot for a typical result in that kind of ight)!

2. Bring your own light source. It can be as simple as a pop-up flash (use a modifier such as a Lumiquest Soft Screen, available from Adorama), a shoe-mounted strobe (again, bounce or shoot through a diffuser to soften the light) or, the best option, an off-camera, remote-controlled flash unit. You don't need to blast a scene with light, but you may need just enough lighting to fill in unwanted faces and to put some “pop” in your subject's eyes.

3. Don't use a tripod. Many municipalities require a permit for tripod photography, and using a tripod could be a police magnet and cause unecessary hassle. Yes, this goes against the common wisdom, but sometimes street smarts must rule the day. Use the highest ISO you can get away with quality-wise, supplement with flash, and don't forget image stabilization. (If you're a pro, of course, consult the appropriate department and get a permit so you can shoot with a tripod if you need to.)

4. Shoot at dusk. The lights of the city are going on, but there's plenty of deepening, blue skylight. Use a wide aperture to get cool specular highlights and colors in the background. Watch your white balance, and consider using diffused flash here. Fortunately, you don't have to invest in pricey cameras to get low-light friendly results. Inexpensive modern DSLRs available from Adorama such as the Nikon D3200 and Pentax K30 deliver outstanding quality at high ISO speeds in low light.

5. Shoot early in the morning or late in the afternoon to take advantage of the golden hour. Since the sun will be close to the horizon, you may get lucky and end up with rays of golden sunshine streaming down the east-west streets, tastefully touching walls of nearby buildings and emphasizing their texture. You can work with this.

Photo  © gioadventures/iStockphoto


Six Types of City Portrait Photos


Here are six types of city portraits you can try and to get you thinking about the possibilities:

Photo ©tunart/iStockphoto


The face in the crowd. Go with your subject into a busy area, focus on him or her, and shoot away as people walk by. Blur the other people while your model poses for you. This may take several attempts, and there's an element of luck and risk involved (someone might walk in front of your camera or peoples' positions in the photo might throw the composition off) but the successes will make it worthwhile. Remember the final shot in the opening sequence to the Mary Tyler Moore Show? That's a perfect source of inspiration for this kind of shot!

Photo © halbergman/iStockphoto


Interacting with Architecture: The architecture in any city will be varied and interesting. Choose elements of a building that offer interesting colors and lines that go with your subject's clothes or the attitude you want to convey. It could be a brick wall, a column, unusual shapes—anything with interesting line, form and/or color that will convey a different mood. By the way...that architecture can range from sparkling new construction to brownstones, run-down tenements, and abandoned buildings. Each conveys a feeling that you and your subject can work with.

Photo © Alina555/iStockphoto


Show The City's Power: Shoot from a low angle, include the tops of towers and skyscrapers to convey a sense of power. This is great if your subject is in the corporate world or wants to project an image of influence and business-world savvy.

Photo © Juanmonino/iStockphoto

Just A Hint of the City: Sometimes you just want a hint of the city—enough to show lines, colors and forms to add energy to your portrait. Use a longer lens and wide aperture to throw the background out of focus and separate the subject from the background. You should also use off-camera, diffused flash (again, just a hint to fill in the shadows) to make the eyes and facial details “pop”.

Photo © quavondo/iStockphoto


A Strong Sense of Place: Use a shorter lens and/or a smaller aperture to boost depth of field, revealing recognizable or generic areas. Be sure to include taxis, busses, distinctive buildings, people going about their business to give your environmental urban portraits a more localized feel. The above image looks like it could be in one of many possible neightborhoods in Manhattan and in fact, it is!

Photo © halbergman/iStockphoto

Up On The Roof: When the Drifters sang “Up On The Roof” they were talking about a world apart that exists in every city (but especially, it seems, in New York). 
As the Drifters sang, "on the roof it's peaceful as can be." Indeed, it can be an oasis of calm over the frenetic activity below. And depending on which roof you can get to, it can also offer spectacular views! If you can get access to a rooftop, you have a golden opportunity to work in a grand cityscape as the backdrop for your portraits. Try different times of day to see how the different quality of light transforms the city.

Standout Night Photography Tips to Help You Master the Craft


Photo by Grant Kaye/180-degree panorama of Racetrack Playa in Death Valley National Park, CA.
Photographers who specialize in night photography and stair trails are somewhat of a special breed. This isn’t so surprising when you realize how much in-depth understanding and science know-how they must possess in order to get the job done – not to mention the specialty gear required to get a quality shot at night.
But don’t let the fancy equipment or the prospect of staying up all night discourage you from pursuing night photography. After speaking with Lake Tahoe-based time-lapse and night photographer Grant Kaye, who was featured in our Selling Nature Photography guide, we compiled the top 6 night photography tips to help you master the craft.

Background

Grant started to seriously pursue night photography when he was working fulltime as a volcano specialist – meaning the only time he had to photograph was after work when the sun had already gone down. “I gravitated to night photography after realizing that I could still make images on days that I had to work until 6pm,” says Grant. “Once I got hooked, I had to learn everything I could about shooting at night.”
Four years ago, Grant gave up his work with volcanoes and started to pursue photography fulltime. But how did he make the move from enthusiast to professional? That’s where Grant’s night photography tips for both style and technique come in handy.

1. Combine elements to create an artistic interpretation.

Grant rarely photographs just the night sky alone – he almost always seeks out unique elements in the landscape to combine with his night shots. The result is images that are based on reality, but contain his artistic interpretation of a scene. “I prefer to shoot in places that have both dark skies and interesting things in the landscape to combine with stars and other extraterrestrial objects,” explains Grant.
The elements that Grant chooses to include in his composition come in all shapes and sizes. It’s often the rugged or funky-looking trees native to the American Southwestern deserts, or a group of jagged rocks alongside a placid lake. The elements don’t take away from the starry skies, but actually add a focal point that draws the viewer into the entire image.
Photo by Grant Kaye/White Mountains, CA.
Grant encourages aspiring night photographers to play around with their surroundings, and not to give up when they don’t see their ideal composition right away. “No one can create great night images without experimenting and learning by trial and error!” says Grant.

2. Gain a solid understanding of lunar & planetary motions.

We can’t harp on this one enough – good, let alone great night photographers have a solid understanding of what the moon and stars are up to at any given time during the year. “Thorough knowledge of moon phase and rise/set times prior to going out shooting is crucial to achieving whatever kind of night shot you want to create,” Grant advises.
“Some images require a rising or setting moon, some a new moon, and some a full moon,” says Grant. “For example, shooting the bright center of our Milky Way galaxy requires dark skies and little-to-no moonlight to really bring out the colors in the ‘dust lanes’ of the galactic center. What’s more, there are only certain times of the year that the middle of the galaxy presents itself high enough above the horizon to shoot it in the dark part of the night.”
To get those stellar star trail shots, night photographers know that it’s all about the rotation of the earth. “A camera fixed on a tripod is actually moving along with everything else on the planet,” explains Grant. “So, if you start a long bulb exposure at night in the northern hemisphere facing in a northerly direction, the stars in the sky will appear as trails in concentric rings around the north star as result of the earth rotating on its north-south axis.”
Photo by Grant Kaye/Middle Velma Lake, Desolation Wilderness, Lake Tahoe, CA - star trails stack with a set of images for stars and one exposure for foreground,at full moon.
Because stars appear the brightest when there is a new moon or the moon has yet to rise, photographers must make a tradeoff: no moonlight might mean better star trails, but you won’t get much illumination on the landscape. Grant suggests photographers pre-visualize how they want the image to come out, and marry that with their understanding of the lunar and planetary motions.
Grant says you have to ask yourself, “Are you shooting stars, or a moonlit landscape? Do you want star points, or trails? Is the moon up? If so what phase is it, and when does it rise and set? How much light pollution is around in the direction you are facing? Each one of those things requires a different strategy.” Proper planning means a better chance of getting the image that you want.

3. Invest in gear with low light capabilities.

Photographers frequently ask Grant if they need to spend boatloads of money on gear to produce images like his. “The answer is mostly no,” says Grant. “All you really need to take photographs at night is a camera with manual mode, film or a memory card, and a tripod.”
Personally, Grant is a Canon shooter and currently uses his trusty 5D Mark II, though he recently purchased a Mark III and has been “blown away by the low-light capability.”
“In the last five years, shooting at night with digital cameras has improved one thousand-fold if not more,” says Grant. “Full-frame, low-noise sensors in cameras with fast RAW processing hardware and speedy storage cards have brought us into a new era of night photography.”
In addition to the Mark II/III, Grant also suggests the Nikon D3s and D800. When it comes to lenses, his go-to is the Canon 16-35mm f/2.8 lens. This gives him the possibility to shoot quality images in low light.
“The use of a wider-aperture prime lens will allow you to let in more light and bring down noise levels,” says Grant. “The Canon 24mm f/1.4 is excellent, but if this is out of your price range, consider getting the ‘nifty 50’ Canon 50mm f/1.8 for around $100. You’ll be shocked at what a difference there is in your night photography between f/2.8 and f/1.8.”
Photo by Grant Kaye/Mono Lake, CA - star trails and long exposure at new moon.
Beyond the body and lens, there are several pieces of equipment that Grant says can help improve the quality of the images you create:
  • Cable release
  • Intervalometer for creating time-lapse
  • Motion control system (for adding an element of foreground motion to time-lapses)
  • Sturdy tripod for wind resistance
  • Headlamp with a red LED
  • Flashlight for light painting
  • Photoshop or Lightroom for noise removal, frame stacking, dodging and burning, etc.
While the above gear isn’t technically necessary, serious professionals should look into investing in a few of these to further improve their night photography.

4. Fall in love with high ISO.

“There really is no catch-all recipe for camera settings and night photography,” admits Grant. “You really have to go back to pre-visualizing what kind of image you want to create, based on what landscape and astronomical features you hope to bring together.”
Still, the general rule for night photography is to use the lowest ISO possible and the widest aperture available. “Digital SLR sensors will start to suffer from high noise at higher ISO values,” says Grant, “and also when performing long exposure at lower values.”
“To throw any potential night shooters a bone… for the most part, you will be shooting at or above ISO 800, below f/6.7, and exposing for at least 10 seconds. Start there, make a guess, check your histogram and LCD screen (don’t bother with the light meter), and give it a try!”
Photo by Grant Kaye/Alabama Hills, Lone Pine, CA - short exposure, wide aperture, high ISO, just before moonrise.
Since star trail images are made with either long exposures or stacking multiple short exposures, noise can be a big issue. And that’s where your post-production skills come in.

5. Master post-production.

The truth is that no matter how high the ISO or how wide your fancy lens can go, it’s pretty difficult to get a totally clean night shot. So Grant suggests creating a “dark frame” and subtracting the noise from your photo.
“Let’s say you want to shoot a long, 15 minute exposure to make a star trails image, and there is a half moon,” says Grant. “You might be at f/2.8, ISO 400. After you make your 15-minute exposure, put the lens cap on, cover your viewfinder with your hat, and then make another 15-minute exposure, or ‘dark frame.’ Then take this image into Photoshop or Lightroom as a layer above your star trails image and change the blending mode of the dark frame to ‘difference.’” This post-production technique removes the noise and gives a cleaner final image.
Photo by Grant Kaye/Racetrack Playa, Death Valley National Park, CA - long exposure of star trails at new moon with dark frame subtraction.
Another method is to stack multiple images shot with as short of an interval that you camera/card combo can handle. “One second is ideal,” says Grant, “and then you can fire off a sequence of a few hundred shots. Others may want to do less post-processing, and they should shoot 3-5 minute exposures with a very short 1-5 second interval between frames, and then stack these.”
Photo by Grant Kaye/Alabama Hills, CA - stack of 279 exposures from a timelapse.
“With either technique,” says Grant, “dark frame subtraction is essential to mitigate noise as a last processing step.”

6. Find the “infinity point”.

Focusing and composing – they’re some of the most basic photographic techniques; but things get tricky when there’s no light to guide you. So instead, night photographers must find the “infinity point” on their lenses.
“I typically start out by temporarily setting my camera to the highest ISO it is capable of,” says Grant. “I then switch the camera into Bulb mode, adjust the focus to approximately where I think the infinity point is, and hold down the shutter with my finger for 2-6 seconds. The resulting image isn’t useable due to extremely high levels of ugly pattern noise, but it will tell you what is in your composition, and whether or not your focus is at the right point by whether the stars are crisp dots or fuzzy.”
From there, you can make small adjustments to your focus until you get it right, and then switch back to usable ISOs. It’s a departure from the “normal” routine, but then again, so is much of night photography.
Photo by Grant Kaye/Bribie Island, Brisbane, Australia - short exposure, just at break of dawn with heavy light pollution and rare astronomical phenomenon.

Additional resources

Grant also shared a few of his favorite resources for more in-depth night photography tips:

Sunday, January 6, 2013

Enhancing Blue Skies in Lightroom


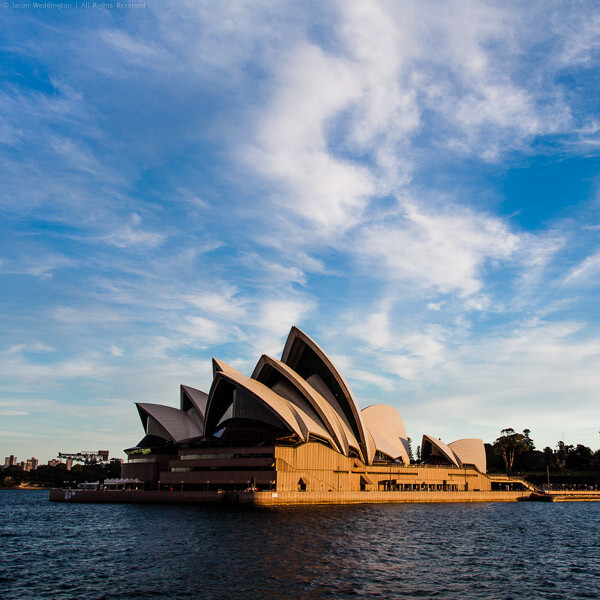
The Color control in Lightroom is a powerful tool for selective color adjustments. This tool allows photographers to adjust the hue, saturation, and luminance of individual color tones. One application of this functionality is enhancing blue skies:
Sydney Opera House
Photo of the famous Sydney Opera House with blue sky enhanced in Lightroom

How to Enhance a Blue Sky

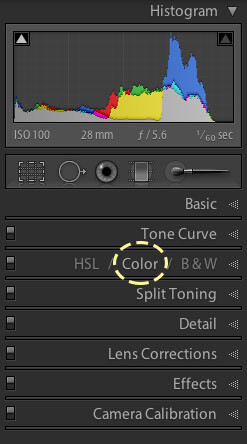
In Lightroom 4, the Color control allows separate control of red, orange, yellow, green, aqua, blue, purple, and magenta:
Lightroom 4 Color Controls
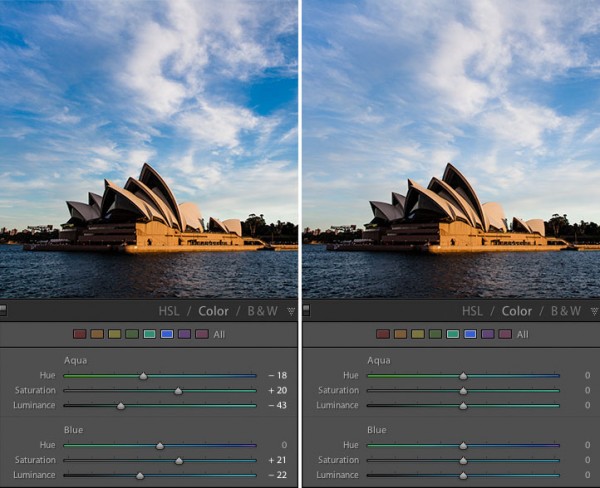
A quick way to emphasize a blue sky is to lower the luminosity and increase the saturation of the blues and aquas in the image:
Enhancing a blue sky in Lightroom
With and without color adjustments
For this image, here are the settings I used:
Aqua
  • Hue: -18
  • Saturation: +20
  • Luminance: -43
Blue
  • Hue: 0
  • Saturation: +21
  • Luminance: -22

Make a Develop Preset

For extra credit, save these settings as a develop preset so that you can quickly apply them later. Note that settings that work to bring out the sky in one photo won’t be perfect for all photos, but this should give you a good starting point.
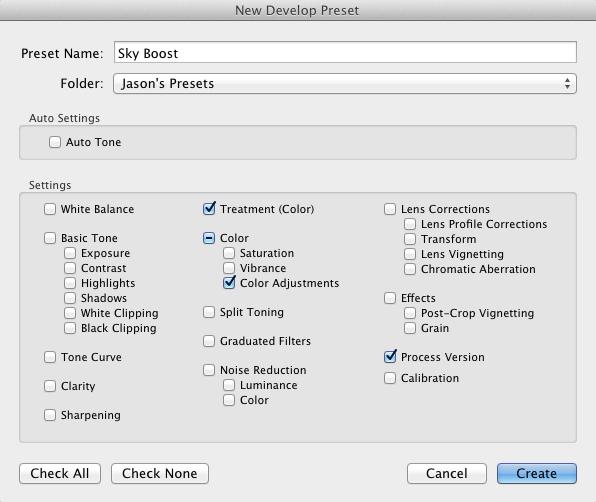
Here are the settings you need to capture for a sky enhancing preset:
Creating a Lightroom Develop Preset
Settings for a sky-enhancing Lr preset
For more detailed information on creating Lightroom Develop Presets, check out this post: 5 Tips for a Faster Lightroom Workflow.
I hope this technique proves useful next time you have a sky that needs just a little more oomph.


Read more: http://digital-photography-school.com/enhancing-blue-skies-in-lightroom#ixzz2HDSuEI7G

How I Shot & Edited – The White Infinity Setup


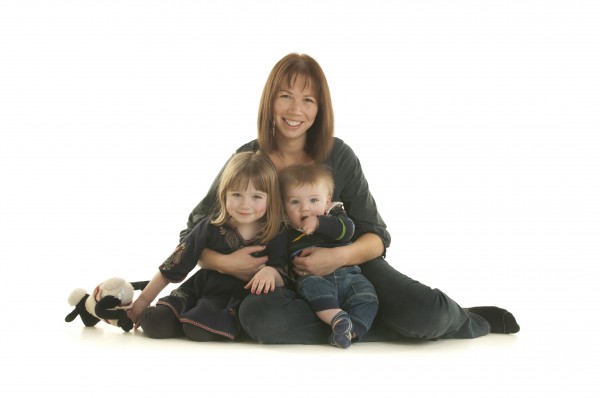
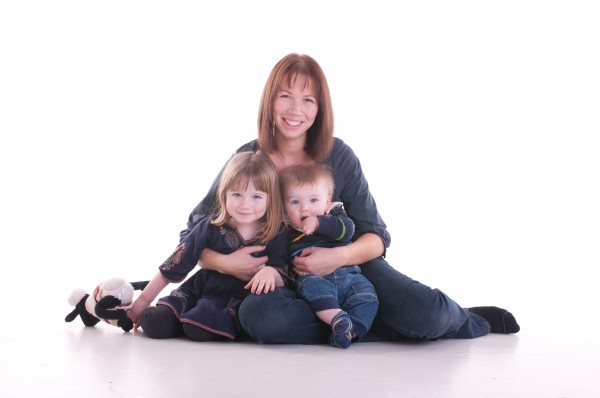
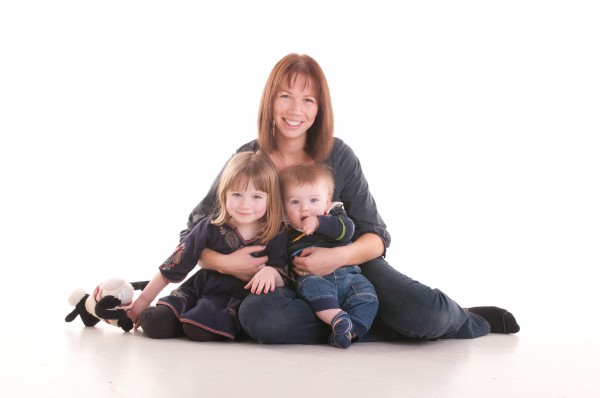
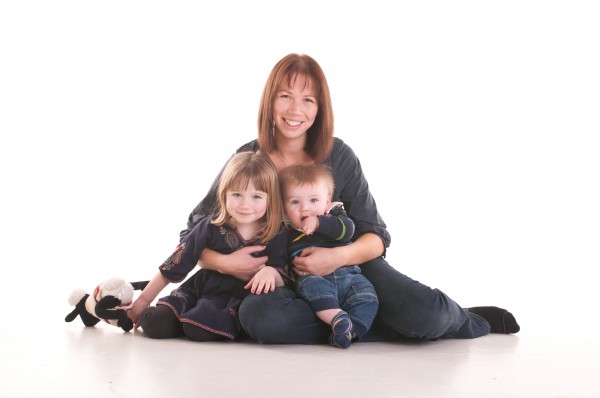
The Classic White Infinity Backdrop
In my last post about studio photography (the killer clamshell) I covered a simple two light setup for achieving a gorgeous soft beauty look.  This time I thought it might be fun to cover something a bit more general purpose and for this there cannot be anything better than the ever classic white infinity setup.
The All Can Do Lighting Setup
There is a reason why pretty much every major fashion or lifestyle magazine makes good use of a white backdrop and that reason is simplicity.  Not only is this lighting arrangement incredibly easy to achieve but it also delivers sharp, detailed portraits with a beautifully clean and uniform background and most importantly no visible seams or edges.  Aesthetics aside its also great for beginners to try as if done correctly provides a large and consistent zone in which to place your subject, allowing you to concentrate less on the position of your lights and more on placing and posing your model.
Families, pets, models, products the white infinity background is probably one of the most versatile setups going and to help you get started here is my approach to nailing this fantastic lighting arrangement:
Disclaimer
Ok, confession time.  The images and steps below are 100% genuine and therefore its going to be pretty obvious that I screwed up my exposure during this shoot.  Before you hit the big red ‘X’ at the top of your browser .. I can explain.  I basically had about 10 minutes to set everything up and 30 mins to take the shots before my studio rental was over.  Because I was in a rush I failed to spot that a large portion of the floor area was under exposed (by about a stop).  I promise I don’t do this all the time and if you don’t believe me check please feel free to check out the studio section of my portfolio site.  Hopefully by showing you my mistakes you will avoid them in the future.
Equipment
This lighting setup requires three lights and is best achieved using studio strobes as opposed to speed lights given the extra power needed to blow out the background.  As I have said before, hiring a studio is a cheap and very effective way to get access to this kind of equipment, making this shot all the easier to achieve.  If you do decide to do this at home however I would definitely recommend spending a little bit of money on a decent quality background paper, you can use a fabric backdrop but in my experience this will absorb much more light making the exposure more difficult than a non fabric setup.  Its also important that you have a background which is long enough to span both the back wall and floor of your shooting space.
For this setup you will need:
  • Two lights for the background, preferably with some form of diffuser to spread and soften the light.
  • A main light with as large a diffuser as you can possibly get, an octobox is ideal however any softbox or umbrella will also work.
  • If possible a light meter is also a great tool for this setup and will help speed up the setup although it isn’t essential.
The Lighting Setup
The important thing to achieve is a background that is both evenly exposed and completely blown out (i.e. solid white).  The ideal result is to have a background that is twice as bright as your subject, the trick here being the ratio of light as opposed to absolute values.
Typically I will set the exposure for my subject using an aperture of around f8.  Therefore if we want to achieve a background which is twice as bright we need to expose the background at an aperture which is one stop smaller than that used for the subject.
Just in case this doesn’t make complete sense, changing the aperture by one stop will either halve or double the available light.  Therefore if when we meter the background we use an aperture which is one stop smaller than the subject, when we open this back up again to take the final shots the background will now be twice as bright as the subject.
Here is how I go about getting this all set:
  1. Assuming a subject aperture of f8, set your camera to manual and dial in an aperture of f11 and a shutter speed of around 1/125 of a second with your lowest ISO.
  2. Aim the two background lights at the backdrop, positioning them to provide as even a spread of light as possible and either fire the stobes or take a test shot.  Take care to only expose the background, try to avoid any of the light spilling forward onto where the subject will be.
  3. If you have a light meter you can now use this to adjust the power of the background lights until you get an even exposure of f11 across the entire backing.  If you don’t have a light meter set the exposure by taking a test shot of the background, varying the power until the entire backdrop is solid white and evenly exposed.  If your camera has it you can use the highlight clipping warning combined with the histogram to double-check your results.   Remember to check the floor as well as the background, don’t make the same mistake as I did.
  4. Now its time to set the subject exposure, before doing so adjust your camera settings to f8 keeping everything else the same.
  5. Now turn off the background lights and place your subject in position.  Again if you have a light meter you can use this to confirm the right flash power to achieve an f8 exposure.  If you don’t have a light meter set your subject exposure by varying the flash power on your main light until you achieve an exposure that looks right.
  6. Now turn all your lights back on and you are all set.
Two background lights and a main subject light.
The Post Processing
Obviously you can post process your final images however you like but just in case you are looking for a few pointers here is a brief overview of my workflow and more importantly how I overcame my exposure malfunction.
Starting Point - Notice the horrible 'yellow' area of underexposed floor.
Step 1: White Balance & Crop - Basic adjustments to get the colour right and to straighten up the slight slant on the composition.

Step 2 - Minor exposure adjustment (slight exposure and fill light) to get the subject lighting right.
Step 3 - Contrast corrections using via a minor curves adjustment (slight 'S') and added detail via Clarity.
Step 4 - Now its time to fix the badly exposed floor. This was done using a gradient filter from the bottom up to increase the exposure on the area on the floor. Minor imperfections were cloned out using a spot healing brush.
Step 5 - All done, final image completed. Much better than the start as I am sure you will agree. All in all this took less than 2 minutes and would have been much less if I had got the exposure correct from the start.
Summary
The white infinity backdrop is a fantastically versatile and satisfying lighting setup and one which I would definitely recommend to anyone wanting to try something different to a single light arrangement.   Hopefully the tips here will help you to have a go at this classic lighting look, unfortunately though finding the super model is down to you!


Read more: http://digital-photography-school.com/how-i-shot-edited-the-white-infinity-setup#ixzz2HDS2zjRn